NEW PERSPECTIVE ON AN OLD ENGINE
1949 Buick 248 Straight 8 Rebuild
Most people have never seen inside a straight 8 engine. Although this isn't the first one we've re-built at Driven Restorations, we are the FIRST to dig into THIS particular ALL ORIGINAL Buick engine and the photos in this blog post let you see it first hand.
It feels like opening a time capsule as we excavate to the depths of the engine, revealing parts that haven't seen open air since being pieced together on the assembly floor in 1948.
 |
| RESCUED AT LAST! The '49 Buick emerges from storage |
Those very parts transported the Buick's family all over Oklahoma, coating her undercarriage in layers of clay and speckling her body with dings along the way. We've been told a few stories hinting that there may have been some shenanigans resulting in a couple of LARGER dings and one particular joy ride ended in her engine to running low on oil (was it low or empty?). The Buick's original 248 never ran the same again. It seemed her fate was to remain shoved, nose first, in the storage garage.
Lucky for us, she was rescued.
It's hard to believe, but members of the very same family who enjoyed this Buick for decades not only kept the car, but they've decided to honor her with a frame off restoration at our shop!
She will be GLORIOUS
In the photos that follow, we take you from tear down through a fresh coat of paint as we meticulously re-constructed the heart of the '49 Buick, it's original 248 Straight 8.
*THIS IS NOT INTENDED TO BE A COMPLETE GUIDE TO REBUILD YOUR ENGINE, BUT RATHER A VISUAL GUIDE TO BASIC STAGES
**All photos are taken at our shop at Driven Restorations LLC Fall of 2017.
**All photos are taken at our shop at Driven Restorations LLC Fall of 2017.
STEP 1: CLEANING!
Before we can undo the bolts, or even find them, we had to un-earth the engine from beneath layers of 1-3" thick and firmly packed Oklahoma clay.
 |
| Arrived at Driven Restorations: 1949 Buick Special 40 Series Under the hood is the all original Buick straight-8, 248 c.i engine |
 |
| Engine bay AFTER cleaning: Yep... Still dirty! Ugh! That orange glow is not rust, it's red clay. |
 |
| Engine bay BEFORE cleaning (This could be a challenge) |
STEP 2: TEAR DOWN
LET THE EXCAVATION BEGIN!!!!
During disassembly watch for cracks, popped freeze plugs or any signs of stress (like the blackened rocker assembly we found). Photograph the "oddities" as you go.
Label all parts you remove. Even if you wont re-use that actual part, they will be needed to ensure the replacement parts match your application.
 |
| Cleaning the head after removing it from the engine |
 |
| Crank removed. Time to clean!Again. I'll get my gloves 😐 |
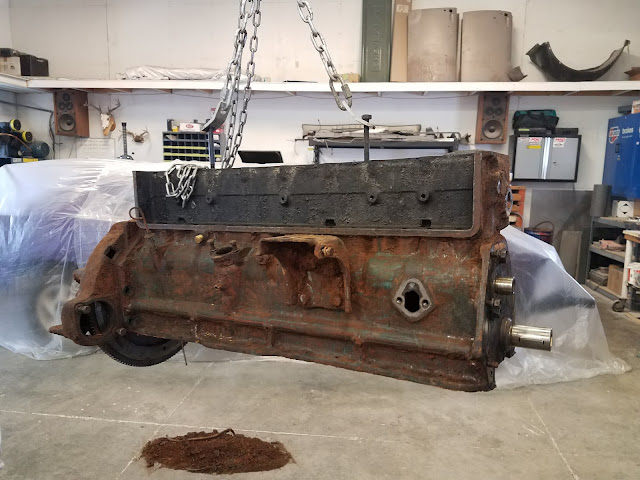 |
| The end of disassembly is within site. That's the original Buick Blue paint peeking out from the last layer of clay |
The verdict on our engine? Overall the block and internal parts were in great shape, but we discovered 2 areas of concern
including a very overheated rocker arm assembly and a cracked manifold.
STEP 3: PARTS ID AND REPLACEMENT
Q: BABBITT OR INSERT BEARINGS?
This particular '49 Buick, although tagged in '49 was built in '48. We used the serial number on the engine to find out if we would have babbitt or Insert bearings. We had a 50/50 chance based on date codes, but the serial number's rarely lie.
From the site Straight 8 Engines here's a summary of 248 changes around '48-'49:
From the site Straight 8 Engines here's a summary of 248 changes around '48-'49:
"1948 - A new "Flex-Fit" oil ring was fitted to the pistons, an improved oil filter was installed, and a new engine/transmission assembly rubber-mounting system was installed which dampened engine and road vibrations to provide passengers a smoother ride. This year also marked the first use of the Dynaflow automatic transmission.
1949 - Insert-type bearings replaced the poured babbit bearings in the connecting rods in mid-1949."
We guessed this block would contain babbitt bearings. This was an "early '49" assembled car, with most of it's parts made and assembled in 1948. Our prediction of finding babbitt bearings was indeed correct.
What is a Babbitt Bearing?(I'll let Wikipedia Explain)
 |
| Original '49 Buick 248 Pistons with Babbitt Bearings Sleeves |
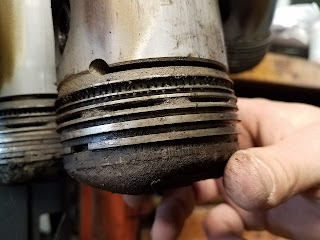 |
| Original '49 Buick 248 Pistons, showing the "flex fit" oil ring noted in the quote above for 1948 improvements to the 248 |
 |
| Original '49 Buick 248 Pistons |
 |
| Original '49 Buick 248 Pistons: Pointing out babbitt sleeves |
 |
| The original set of pistons were cleaned, boxed up as core exchanges and sent out to the East Coast. |
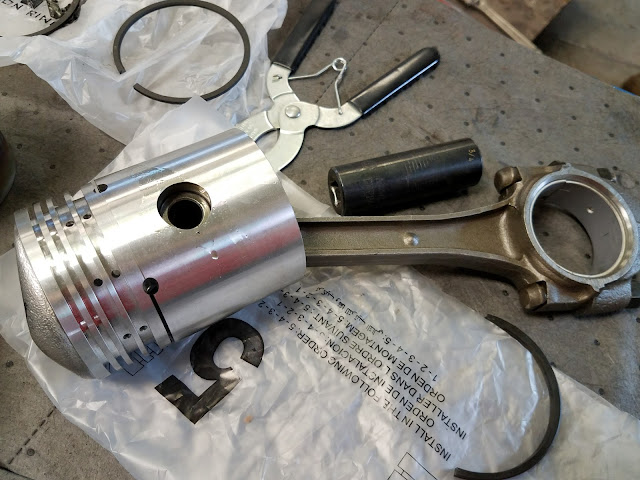 |
| The exchanged insert type bearing pistons arrive for the bored out 248c.i engine. We sent in the original pistons as core exchange for a full set of correctly sized, insert type bearing pistons. |
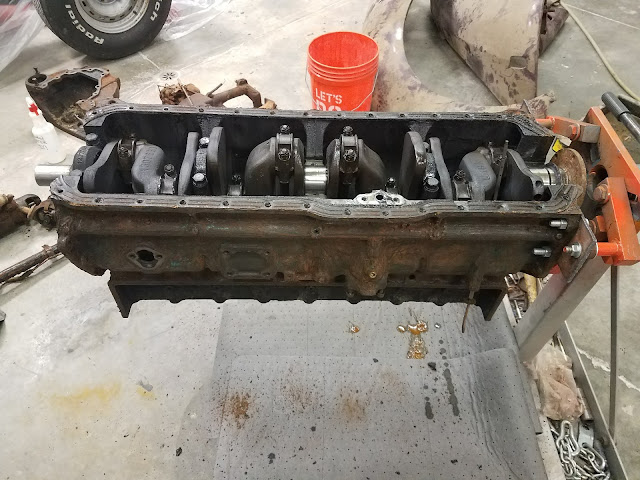 |
| 248 engine block and crank have been lightly cleaned by us in the shop to inspect for cracks or damage (😓 so much cleaning!). They look great so they are ready to go out to the machine shop |
TIPS for BUYING PARTS and ENSURING PROPER FIT after MACHINING:
1. YOU MUST KNOW THE BORE OF THE BLOCK AND GRIND OF THE CRANK BEFORE ORDERING PISTONS, RINGS AND RELATED PARTS
As an example, our specs for this application:
The pistons and rings we ordered to spec per our machine shop's final bore on the block. Depending on engine wear, you may have to be more aggressive with the bore to achieve a "clean" surface. 0.30 is a fairly standard bore to start
For this application we did the 0.20 bore because the 0.30 bore was out of stock for the foreseeable future.
*You may want to check on parts availability with your supplier before selecting a bore (if you have a choice)
Whether you pick them up yourself from the machine shop/store/ re-builder, or the parts are shipped to you, ALWAYS INSPECT them to be sure you're happy with the result and count them to verify that you received every part you sent out.
Never apologize for inspecting. Some shipping carrier's may be impatient as you unpack your parts. Remember, it's their job to delivery things intact or return to sender if there is a problem.
We use trusted partners with a proven track record of of quality work. Sticking with one service provider can help ensure your specifications are met and the work gets done quickly, but they are still humans! So, the rule to inspect everything still applies. When we picked up the engine block and crank we double checked that all measurements were within the spec, the parts were clean, and the block was unpainted (A+ for our engine machine shop again!)
As an example, our specs for this application:
- Crank ground 0.10
- Block bored 0.20 over
The pistons and rings we ordered to spec per our machine shop's final bore on the block. Depending on engine wear, you may have to be more aggressive with the bore to achieve a "clean" surface. 0.30 is a fairly standard bore to start
For this application we did the 0.20 bore because the 0.30 bore was out of stock for the foreseeable future.
*You may want to check on parts availability with your supplier before selecting a bore (if you have a choice)
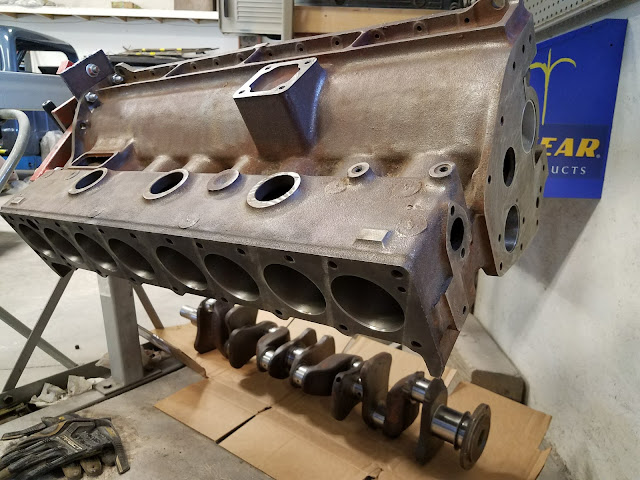 |
| TADA! THE BLOCK AND CRANK ARE ALREADY BACK! Just kidding...It took a couple months in real time, which is relatively fast for a machine shop that time of year. |
INSPECT BEFORE YOU ACCEPT!
Whether you pick them up yourself from the machine shop/store/ re-builder, or the parts are shipped to you, ALWAYS INSPECT them to be sure you're happy with the result and count them to verify that you received every part you sent out.
Never apologize for inspecting. Some shipping carrier's may be impatient as you unpack your parts. Remember, it's their job to delivery things intact or return to sender if there is a problem.
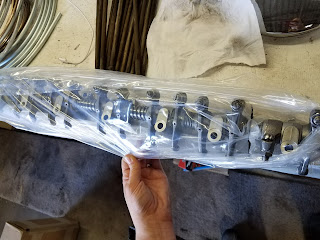 |
| Rocker arm assembly re-built via a service in the North East |
WHAT ARE YOU LOOKING FOR UPON INSPECTION?
- ACCURACY: Engine measurements will impact every other part of your engine (bore and stroke matter!). If they are wrong they must be corrected before assembly, otherwise you can plan on doing this re-build again in the very near future.
- COMPLETENESS: On more than one occasion we have received a box with a hole or ripped tape. We've dealt with broken or missing piston rings, missing hardware, and even missing valve springs that got set aside during cleaning and never made it back into the box. (Very frustrating!!!)You think you're ready to assemble...and then suddenly you're not. Before you ship parts for re-build take the following steps as insurance:
- Label parts going in the box
- Photograph what you are sending out with labels visible
- Write an inventory of parts you are sending
- Record the date of shipment
- Note the expected date of return
 |
| Buick 248 head after machining and inspection |
STEP 4: ASSEMBLY
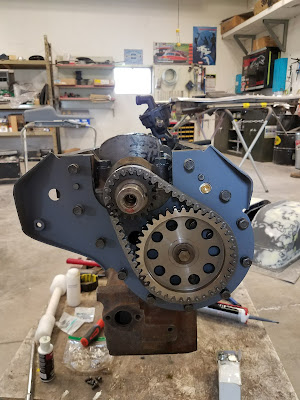
Assembly has a natural progression. In the photos that follow, you'll notice that Steve starts at the "bottom", with the crankshaft, following the assembly instructions per the Buick Shop/Service manual. As seen in the photo below, Steve pre-assembled the engine head
- "Clean Room" or at least a VERY clean work area:
- Dust and debri are the enemy of a long lasting, functional engine. Do not get dirt, metal shavings, hardware, tape...or ANYTHING inside the engine that isn't supposed to be there.
- Assembly lubricant and rubber gloves
- Latex gloves are a handy thing to keep in the shop
- Heavy Duty Engine stand:
- Capable of supporting a Straight-8 Buick engine FULLY ASSEMBLED. These are HEAVY with quite awkward weight distribution.
- In a pinch, custom fabricated engine cradles work very well, just make sure your welds are solid!
- Organizer tray/tool cart
- Lay out ALL machined parts, cleaned, labeled and in order of installation (per instructions and parts labels).
- Gaskets and gasket set/liquid gasket
- An engine cannot be assembled without it's gaskets, hopefully that's obvious...If it isn't obvious, back away... slowly.
- Hardware
- Ensure you have the right number of each piece of hardware
- Sort hardware according to the parts they will attach
- Check threads: Any bolts broken off in the block?
- Re-thread bolts/bolt holes as needed being conscious of metal shavings and keeping the block clean
- Instructions and Assembly Manuals
- Review any instructions that came back with parts that were re-built.
- At times, small changes in metals (modern vs '48) can modify assembly procedure's from the standard shop manual process typically used. (type of lubricant, order of assembly, size of bolts/ parts etc)
- Know what your "new" used parts need in advance.
- Your phone
- Phone a friend if you get stumped
- Look up additional photos or instructions as needed.
- Time and lighting
- Set aside at least 4 hours in your clean, well lit work space to complete the initial assembly
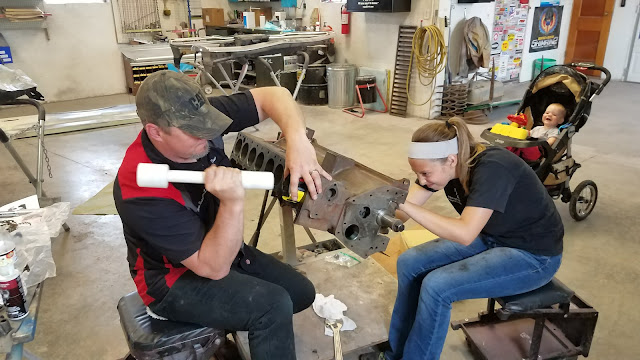
- Bonus points if your work space is free of distractions like food, kids, dogs... you know, all the things that are in our shop photo during piston installation below! Oops 😥
- Get your tools and get started!
- Hopefully you took time to review the shop manual which might list a tool (or two) that you don't currently own.
- When in doubt...call Steve. (It's what I would do😉)
- Put everything down where you found it and go get yourself a "STEVE" of your very own! He not only assembles Straight 8 Engines, but he's done straight 6's for Chevy trucks, Small blocks and built big block powerhouses.
 |
| 248 Block with new pistons installed |
 |
| Cam Shaft installation in the Straight 8 can be tricky. This is due to the progressive bearing sizes. Be sure you do not damage the lobes or break a bearing when installing. Patience |
STEP 5: PAINT
We apply the color using our favorite engine enamel***** applied via HVLP paint equipment in our booth.
(Sorry, we're keeping our secret paint brand a secret...for now).
 |
| The Original "Buick Blue" applied to the engine |
For best results pay close attention to PREP. Clean and de-grease thoroughly then mask all openings and insert hardware in threaded holes. Use your favorite rust proofing High Temp Paint. Aerosol paints will work if you don't have other paint equipment.

〈Need more info from a Buick Database?〉
TRY THE FOLLOWING LINKS
- BEST FORUM OUT THERE: AACA Forums
- Search friendly Q/A threads (a fancy name for an online conversation if you're "uninitiated"), friendly and responsive users (within days to a week usually) and a great resource for rare parts, assembly photos for reference and a wealth of historical knowledge. You will have to register if you need to post questions.
- Photo gallery of an original *mostly* complete '49 Buick Special Series 40 which happened to be for sale recently. Helpful photos but ask the Buick forum listed above if you need detailed information on parts/installation: Sunset Classics 1949 Buick Gallery
- Original spec database for '49 Buick's: Classic Car Database
- Paint colors based on original Buick Body Code tag
Still have questions or need someone to help get your Straight 8 back on the road? email us at drivenrestorations@gmail.com




Thanks for this! Very little on repairing the straight 8s these days.
ReplyDeleteThis was very interesting. Thanks for posting it on here
ReplyDelete