1970 Road Runner
1968-1970 B-Body Mopar Windshield replacement
In the event that you have to replace your windshield on your 1968-1970 B-body Mopar, you need to know what you're getting into before getting started. This is a step by step guide to the process of replacing or removing and reinstalling the original glass.
In our example, this 1970 Plymouth Road Runner was receiving a complete paint job with interior and exterior color change. To paint a car properly, the windshield must be removed.
Read on for our step by step process of handling the windshield.
 |
| BEFORE: This 1970 Roadrunner will receive a complete interior and exterior color change and the vinyl top will be eliminated |
 |
| Before: Existing trim and glass |
 |
| Before: Existing trim and glass |
1. Remove the existing stainless trim around the windshield. Careful not to bend or crease your trim, look at the clip type and location(more photos later in this post), and use a clip removal tool (looks like a forked pry bar in most cases) suitable for your application.
2. Remove the windshield gasket and glass. It is likely that you will need to cut the rubber weatherstripping gasket that is holding the glass in place to remove the glass without breaking it. There are a variety of tools made for this purpose which will allow you to cut the gasket without gouging your windshield.
NOTE- Save any and all clips that are screwed into the body of the car which hold the trim in place. You will need these or their replacements.
3. Inspect the windshield glass channels for rust and holes
 |
| We lucked out with mostly surface rust on this Road Runner. |
4. Clean up, repair, seal and paint the glass channel per your application. In this case we needed a complete color change and did all repairs required followed by painting the entire car.
 |
| Cleaned, prepped, seam sealed and then painted, the glass channel area is ready for clip placement, windshield gasket and then glass installation |
Place clips in the correct locations around the windshield and clean the windshield you plan to install. All clips and glass should be clean and free of old urethane.
Hopefully you kept all the clips when you took the glass out. You will need them for re-installation. Didn't keep them or they're not fit for use? Find new ones online at Mega parts USA or another retailer of your choice. USE THE OLD CLIPS TO COMPARE TO THE ONES YOU BUY! Also note, the re-pops almost never fit and work quite like the original clips, so save them if you can!
6. Lay out your gasket so it will be easier to form to the opening.Place urethane adhesive in the glass channel run.(photo below)
 |
| Urethane in place in the glass channel area as we prepare to place the windshield gasket. This stuff is a complete mess. Be very careful not to get it on any surface you plan on keeping intact! |
 |
| Windshield gasket in place. Ready for glass installation |
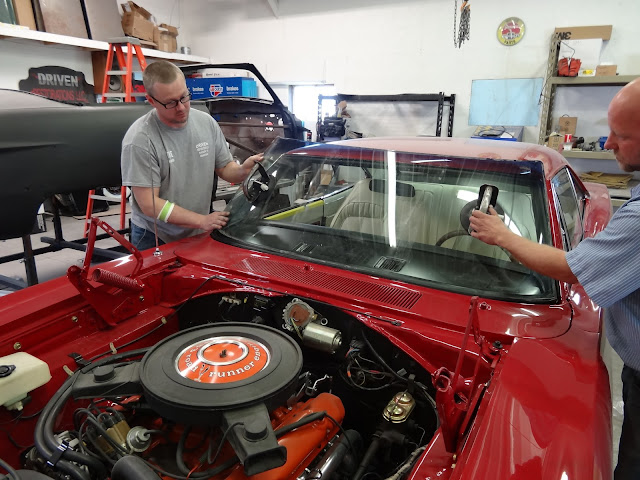
8. Place the windshield. 2 people with suction cups make glass placement much easier.
 |
| Using proper equipment for handling the glass makes this a smooth process. 2 people with suction cups ensures easier placement. Try to seat the bottom of the windshield directly into the gasket. |
 |
| Use the plastic installation stick aka equalizer stick or push stick (This is a low dollar tool investment that you'll need for this) to seat the glass in the gasket without scratching surfaces. |
 |
| Once seated in the gasket all the way around the windshield, place a urethane sealant in the gasket, immediately removing any excess |
 |
| Windshield and gasket in place |
While you wait, be sure the trim clean and free of any over spray, urethane or dirt, especially where it need to attach to the clips and on the surface where everyone can see it. With the trim still off the car, use lacquer thinner or adhesive remover to remove urethane. Steel wool (very fine "000" or "0000") works well to polish the top surface or remove rust on the back side of the trim.
 |
| Gasket and glass in place: Note the clip location |
 |
| Gasket and glass in place: Note the clip location |
 |
| Gasket and glass in place: Note the clip location |
 |
| Re-installed cleaned and polished stainless trim windshield surround to finish up the windshield installation. |
 |
| The final result should be a sealed and well fitted windshield, free of leaks! |
Application and process may vary slightly between makes and models, but the general principals will apply to this era Mopar.
Not sure you can handle it? Contact your local windshield and glass company and ask about the cost of a professional installation. They will typically not install the stainless trim for you. You'll also still need to be sure you have the parts on hand and that they are clean and ready to be placed on the car.
Did this method work for you? We welcome your feedback and questions!
Contact us at drivenrestorations@gmail.com


I don’t ordinarily comment but I gotta say thanks for the post on this perfect one : D. windshield replacement quote
ReplyDeleteYou have done a great job on this article. It’s very readable and highly intelligent. You have even managed to make it understandable and easy to read. You have some real writing talent. Thank you. Phoenix Windshield Replacement
ReplyDeleteGreat article! Do you have one for the replacement of the rear window?
ReplyDeleteVery nice explanation and demonstration. Thank you very much
ReplyDeleteGreat Job!
ReplyDeleteIt skipped the part about locking the gasket together before trim installation.
ReplyDelete